Homeschool Art Course
Art • Lifestyle • Education
Gather Your Supplies
February 08, 2023
post photo preview

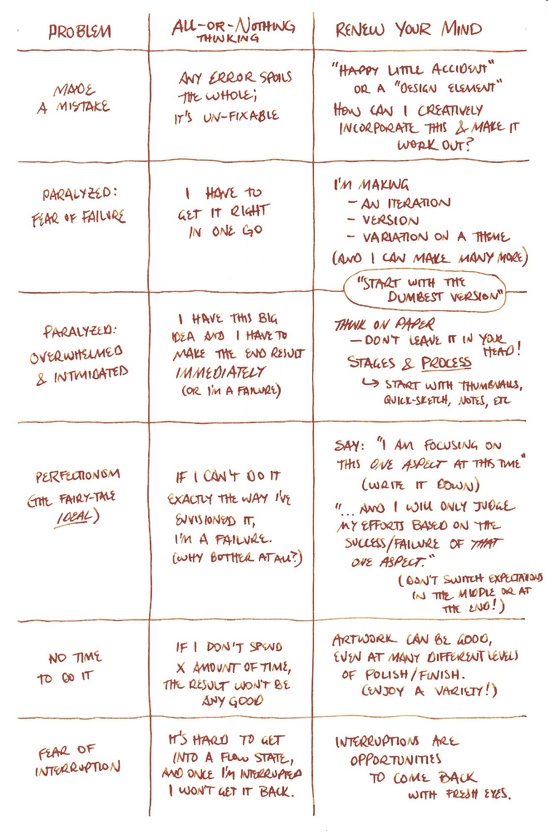
Art supplies can hang people up, but shouldn’t.

When most people see an artist they would like to imitate, making something awesome, their first thought is something along the lines of, “Oh, if only I had that [insert art supply] I, too, would be able to do that.”

This is a distraction, a roadblock, an excuse for not getting started.

While some art projects really do have to have specialized materials, drawing is not among them.

No art supply will ever magically make you good at drawing. Only hard work and practice can do that.


Supply Gathering List

Parents homeschooling their children, and any art student on a budget, will be glad to know that there won’t be any expensive supply lists for this course. That is why your first supply list is called a “Gathering List”—it’s intended to be made up of items you assemble from your own home.

You’ll need just two items per student: something to draw with, and something to draw on.

Suggested Drawing Implements:

  • A regular wood pencil (#2 or HB grade)

  • A mechanical pencil

  • Colored pencil (pretty much any color; light blue, orange, and red are traditional colors to use)

  • A ballpoint pen

  • A crayon

  • …etc

Suggested Drawing Surfaces:

  • Copy or printer paper (20# is good)

  • Regular notebook

  • Graph paper

  • Notebook filler paper

  • …etc

If you have all or most of these, I most highly recommend a regular wood pencil and copy paper as your first choice, for reasons that will become clear as you work through the lessons.

If you do not have what I suggest, look around for possible substitutes. Almost anything that can make marks, and any surface that it’s safe to mark on, can be used for practice.


For those who already have art supplies…

Excellent! I recommend you use whatever supplies you are most familiar with already.

Pencil, charcoal, pastel, or pen—whatever drawing tool you happen to have and are comfortable using will do very nicely. For most practice assignments, you’ll want to use a cheap sketchbook or copy paper, and use your nicer drawing papers for applied drawing assignments.

However… If you have found yourself struggling with the art supply block I outlined in the introduction to this post, or if you feel in any way overwhelmed by options because you have many supplies…

I strongly suggest you put all your “Art Supplies” away for a short period of time, and use the very simple office supplies I have suggested for your first several assignments.

You will likely get over this block very quickly if you use materials and tools on which you haven’t attached undue significance.


A Suspicious Absence…

Some of you may wonder at the suspicious absence of erasers on this list.

This is not an oversight. I do not recommend students use erasers. There’s nothing wrong with using them, but many beginners use them excessively and in a way that hinders learning.

Not using erasers forces an artist to draw intentionally, and to mean the marks they make. This attitude and mental habit will help you improve much more quickly, and your drawings will look much nicer and more polished. So, I recommend that at least for your practice assignments, you minimize or completely banish the use of erasers.

When you are sketching or drawing for your own pleasure, or doing an application assignment, feel free to use an eraser as necessary.

The best erasers to use for drawing are white vinyl erasers or kneaded rubber erasers. Both are readily available and inexpensive.

The pink kind, found on regular #2 wood pencils, are prone to smearing and should be kept away from artwork.


Getting Started

Once you have assembled the supplies you’re going to use for practice, start drawing!

The main reason why I want you to use supplies you already have is so that you’ve no excuse for not starting today. Starting really is the hardest, so don’t put it off!

HAVE FUN!

Save what you draw.

community logo
Join the Homeschool Art Course Community
To read more articles like this, sign up and join my community today
0
What else you may like…
Videos
Podcasts
Posts
Articles
A Longer Upside-Down Drawing

Here’s another unedited (real-time) upside down drawing. (No sound again—sorry!) This one’s 20 minutes.

I used ballpoint pen for this one, which is a new medium for me. I’m really enjoying it! Takes some getting used to. No erasing, and not huge fan of the blots…still figuring out how to control those.

So far, this is my favorite upside-down drawing practice. I think I’ll continue it and my ballpoint experiments by adding shading to the line sketch. Will share updates!

00:19:09
Quick Real-Time Sketch

The Ford Madox Brown sketch in real time (no sound). About 3 minutes.

00:03:33
Upside Down Drawing

I’m a bit rusty on doing copies, so next week’s assignment to do an upside down drawing is a great warm-up. Haven’t done anything direct in ink for a while, either, but I couldn’t resist giving it a try. I’m loving this brown ballpoint I got from Fisher Space Pens!

Not too bad for a first upside-down drawing (not really my first, but it’s been a long while). I’m feeling good and I think I’m gonna try some more.

This is the real-time video, 14 minutes with no sound. Planning on doing a speed edit with a voiceover later.

If interested, the book I’m drawing out of is called Pre-Raphaelite Drawing, by Colin Cruise. I’d love to get a copy! But it’s expensive, so I’m just working out of a library book. The Pre-Raphaelites are my favorite masters to study at the moment.

00:14:32
Paul Revere's Ride

Art is a great activity to combine with other subjects--and drawing has been shown to increase retention in students. Try doing a little drawing project for history class today: Paul Revere's famous ride, which happened on this day in history, April 18th, 1775.

Listen to this reading of the poem by Henry Wadsworth Longfellow for ideas of what to draw.

Read along here: https://discoverpoetry.com/poems/henry-wadsworth-longfellow/paul-reveres-ride/

Paul Revere's Ride
February 07, 2023
Orientation and Pep Talk

Hello and welcome to the Homeschool Art Course!

Drawing is one of the most human of activities. Children do it at a young age without inhibition; so should you!

The enjoyment of the activity of drawing has been stolen from many by the myth of talent. Let me assure you: You do not have to have talent to learn the skills of drawing. And you do not even have to be good at it in order to enjoy doing it! Drawing is a rewarding pastime in itself.

Drawing:

  • gives you something to do off of electronic devices and social media.

  • is a companionable way to enjoy time with friends and family.

  • develops your ability to focus for extended periods of time.

  • increases motor control and dexterity.

  • builds confidence.

  • creates a wonderful record of your life.

With all these benefits—Don’t hesitate and don’t wait to get started!


What You Need:

You do not need any special tools or materials to get started drawing. If you have:

  1. something to draw with (a regular pencil, mechanical pencil, ballpoint pen…)

  2. and something to draw on (copier paper, notebook paper, graph paper…)

…then you are ready to go!


The Seven Principles

I follow a few key principles in my self-taught art studies that make my lessons great for beginners of all ages and abilities who want to follow along:

  1. Drawing is a SKILL, not a talent. Skills can be learned. Talent may smooth the way, but hard work reigns supreme.

  2. It’s best to learn each skill in isolation. Learn small, get big results.

  3. You can’t judge your work if you don’t know what you were trying to do. (As they say, the unaimed arrow never misses.) Before beginning, always have a clear goal—and afterward, only judge your results based on what you set out to do.

  4. The best lessons are micro-masteries: small, repeatable tasks that are inherently satisfying to do, and impressive enough to motivate continued exploration.

  5. Memorization and formulae are the imaginative artist’s best friend. The less you have to invent from scratch in each drawing, the more creative you can be.

  6. Good draftsmanship is good communication. You can not “express yourself” until you have learned the language, grammar, and vocabulary of the visual language that is Art. Don’t put the cart before the horse: learn the skills, then apply them to make effective visual statements.

  7. Intentional practice over short intervals is more valuable than long, haphazard efforts. Even just 2 minutes a day of intentional practice will improve your skills.


A Pep Talk Before Beginning…

Many people, especially adults, have a fear of failure that keeps them from getting started. That is why my Principle #1 is that Drawing is a Skill that Can Be Taught.

Do you expect someone who has never played violin to pick it up and play Bach? Do you think someone who has never played basketball, maybe never even watched a game, would be able to pick up the ball and play like Michael Jordan?

Of course not!

Why do we treat drawing differently? It is not any different. So give yourself some grace, and the room to grow. Or in other words, accept “failures” and “bad drawings” as part of the learning process—not as a statement about you or your abilities.

Some things to bear in mind:

  • Every drawing is really just squiggles on a piece of paper. Its value comes from you attributing it value. So don’t blow it out of proportion.

  • It’s okay not to like a drawing. Most professional artists can tell you something that they don’t like or would change about even their best works. The secret is: Don’t take it personally.

  • Not taking it personally means separating yourself from your artwork. Over-identifying with your work is a major problem and will hold you back.

  • A “bad” drawing may not really be bad. Very often it’s just not what you intended. And that’s what learning to draw is all about: How do I get the results I want?

  • So don’t label your drawings “bad” or “failures.” Call them iterations. Each one is only a version; the next version is a chance to learn from the past ones.

  • Approach learning like doing experiments. “Oh—that didn’t work out. Maybe if I try this—?” And give it a go.

  • Learn to look at your work with some objectivity by asking yourself, “Why don’t I like this?” or “What don’t I like about it?” (If you don’t know, that’s okay. Part of learning is finding out the answers to “What do I like?” and “What don’t I like?”)

  • Drawings are virtually never done right the first time. The idea that you should get it right in one go is a perfectionistic urge that should be abandoned. Have a work ethic about it instead: I’m going to keep at it until I figure out a way to make it work, or until I like it.

Share this post with someone who needs to read it!


What do I draw?

To get started, it really doesn’t matter what you draw—the hard part is just starting to put marks on a page. If you start with stick figures, and do those every day this week, even for just two minutes a day, that’s a wonderful place to begin. Drawing circles, boxes, and cylinders is another great, low-key way of beginning.

Showing up and making marks is the best way to begin. Even if it’s late and you’re exhausted and all you can manage to do is a random little squiggle…do it.

When the next lesson comes out (every Monday), join in! If you start today with doodles, you’ll be ahead of the game because you’ll already have a start on your amazing drawing habit.

Remember: The person who loves walking will go farther than the person who loves the destination. The person who enjoys the process of drawing will draw more than someone who is only there for the outcome.

When you are drawing, even when it’s a doodle or a squiggle, make the conscious decision to enjoy doing it. Think of a toddler or small child: They are working from the sheer enjoyment of just making marks, feeling a crayon running across the paper, and being delighted by the pop of color that appears under their touch.

Studies have shown that your emotional response to an activity plays a major role in forming habits. If you feel good when you’re drawing, you’re more likely to want to draw again. So do all you can to make the experience enjoyable, and just decide that it is so.

There’s no faster way to get better at drawing than to practice—so we may as well enjoy the process.

As the Golden Age illustrator Andrew Loomis puts it in his book Fun With a Pencil,

“Most folks love to draw even when they know little about it. ... Because it's so much fun, and so easy, it's a shame not to be able to do it better.”

So let’s get started!

Happy drawing,

—Mallory

Read full Article
See More
Available on mobile and TV devices
google store google store app store app store
google store google store app tv store app tv store amazon store amazon store roku store roku store
Powered by Locals